Ever wondered why finding an image URL feels like a tiny digital superpower? You’re not alone!
With over 95 million photos uploaded to Instagram every day and nearly every webpage requesting at least one image (99.9% of them, to be exact), visuals have become the backbone of the internet we scroll, share, and screenshot daily.
No matter if you’re blogging, building a website, or sharing content on social, knowing how to grab an image’s direct link can save you minutes (or even hours) of frustration.
And with content featuring images getting up to 94% more views than text-only posts, mastering this simple trick could seriously boost your creative workflow.
Ready to get started?
First things first, let’s clear up what an image URL actually is…
What is an image URL?
Simply put, an “image URL” is just a URL that points directly to an image file on the internet. It is the exact address your browser uses to find and show that picture online.
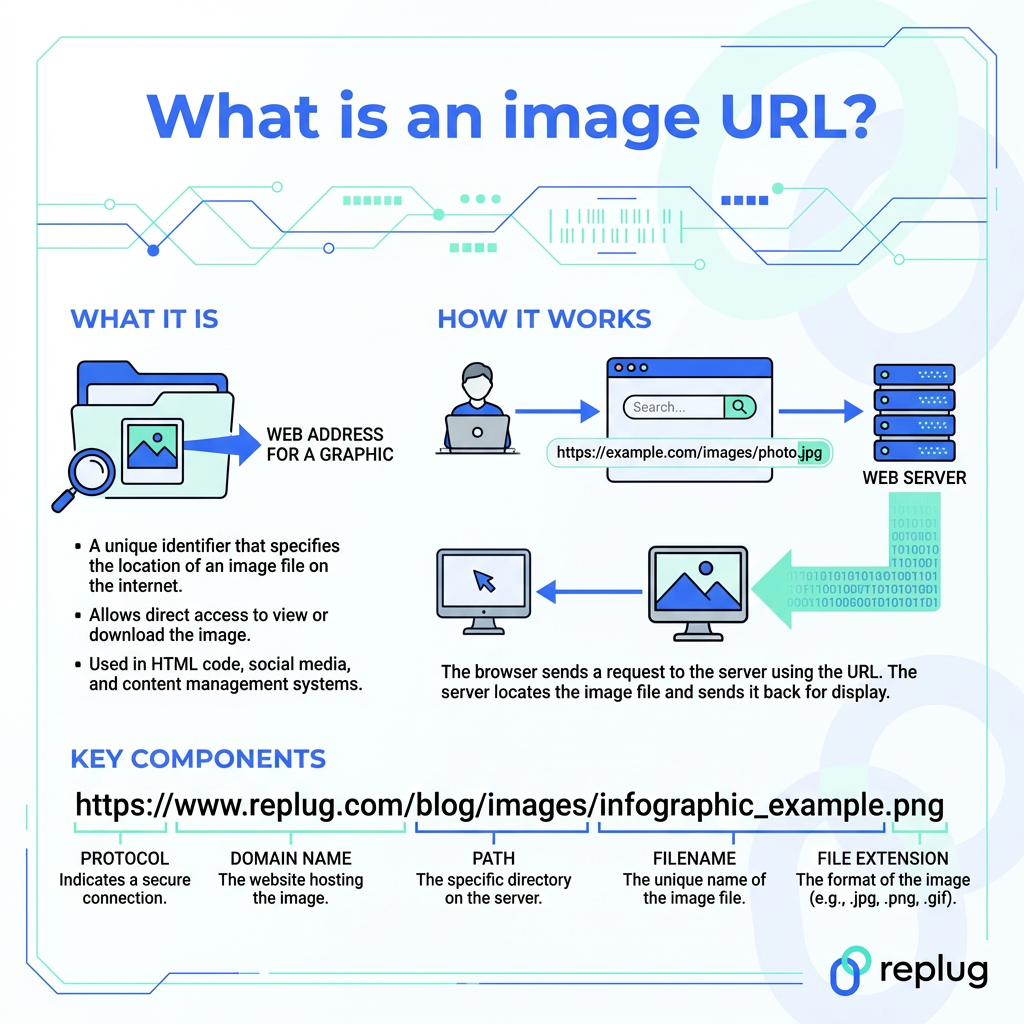
Just like regular links help your browser locate web pages, image URLs help it fetch and display images everywhere you see them: blogs, social media, websites, and apps.
Think of an image URL as a direct path to a photo stored somewhere on a server. When you insert that URL into an <img> tag or paste it into a browser’s address bar, the browser knows exactly where to go and what image to pull up.
Image URL example
Here’s what an image URL actually looks like:
https://www.example.com/images/photo.jpg
In this case:
- https:// is the protocol telling your browser how to connect.
- www.example.com is the domain name where the image lives.
- /images/photo.jpg is the path leading right to the picture file.
How to get an image URL on mobile
If you’re on the go and need to grab a direct link to a photo from the internet, your smartphone makes it surprisingly easy (whether you’re using an iPhone or an Android device).
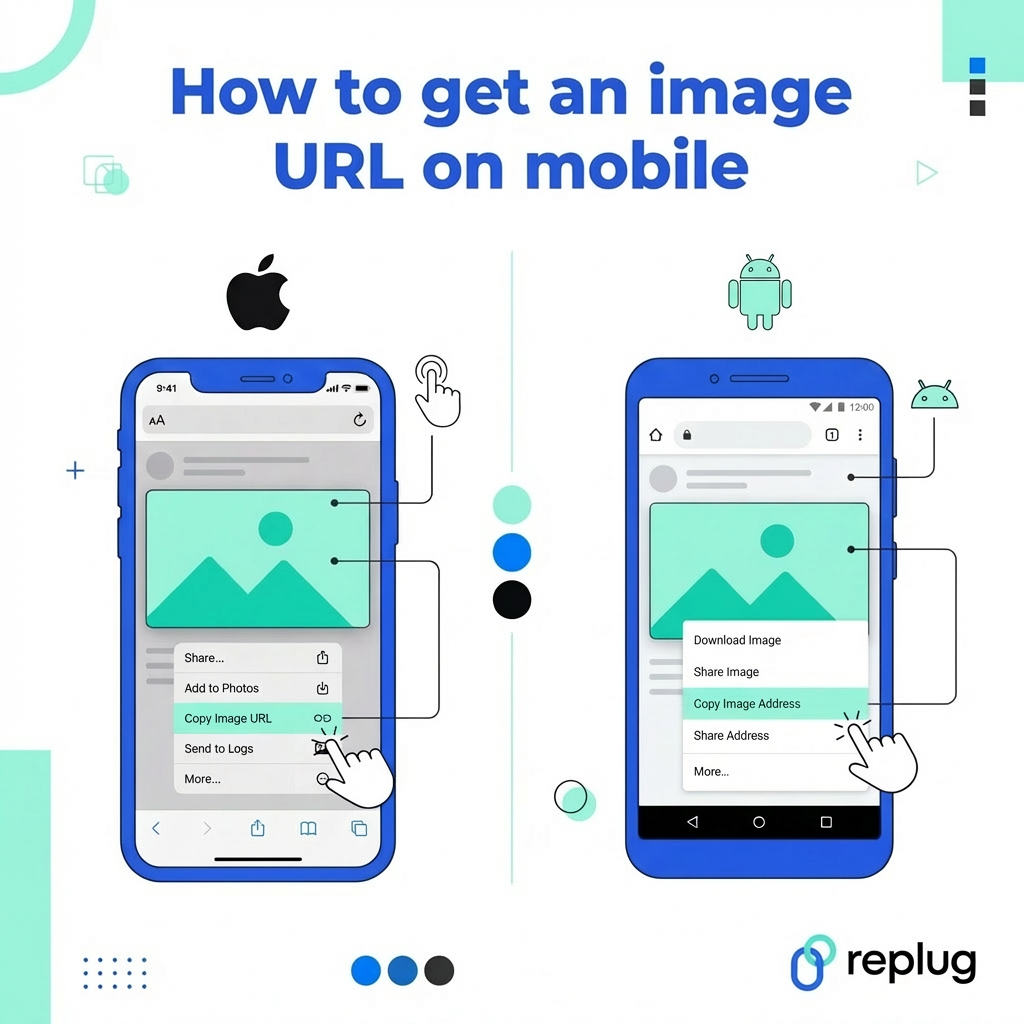
This quick guide will walk you through it step by step so you can copy image URLs straight from your mobile browser without hassle.
How to get an image URL on iPhone
Here’s how to get the URL of an image on an iPhone using a browser (like Safari or Chrome):
1. Open your web browser (Safari or Chrome) and go to the page with the image you want.
2. Tap and hold on the image until a menu pops up.
3. If you see “Copy Image Address” or “Copy”, tap it. This saves the image URL to your clipboard.
4. If you don’t see that option, choose “Open Image in New Tab”, then long-press the image again to see the copy option.
5. Paste the link anywhere you need it. Just tap and hold a text field and hit “Paste”.
This works great in most browsers, and once the image URL is in your clipboard, you can easily share or save it.
How to get an image URL on an Android smartphone
On Android, the process is very similar and usually even more straightforward:
1. Open your mobile browser (like Chrome or Firefox).
2. Find the image you want the link to, then long-press it.
3. From the menu that appears, tap “Copy image address” or something like “Copy link address” or simply “Copy link”. This grabs the image URL.
4. If that option doesn’t show up, choose “Open Image in New Tab”, then copy the URL from the browser’s address bar.
5. Paste the URL into a message, note, or blog editor by tapping and holding a text area and hitting “Paste”.
And that’s it!
With these simple steps, you can learn how to get an image URL on a phone in just a few taps. Perfect for sharing, embedding, or saving photos online!
How to get an image URL on iPad
Grabbing an image URL on an iPad is similar to doing it on other mobile devices, but iPads don’t always show a direct “copy image address” option in Safari as desktops do.
Instead, you’ll use a long-press or alternative browser features to get the link, then paste it wherever you need.
Step-by-step guide to get an image URL on iPad:
1. Open your browser (Safari, Chrome, or another web browser)
- If the site you’re viewing has images you want the URL for, start by navigating to that page.
2. Long-press the image
- Tap and hold your finger on the image until a menu appears.
- In some browsers, you’ll see options like “Share” or “Copy.”
3. Use the Share option
- In Safari or the Google app, tap the “More (⋯)” or “Share” button next to the image, then choose “Copy”. This copies the URL (the image’s web address) to your clipboard.
4. Alternatively use Chrome
- If Safari doesn’t show the right options, open the same webpage in the Chrome app.
- Long-press the image, then choose Share (three dots) > Copy link to get the image’s URL.
5. Paste the URL
- Go to the text field where you want to use the link (notes, email, blog editor, etc.), tap and hold, then select “Paste” to insert the image URL.
That’s all there is to it!
With these quick steps on your iPad, you can pull the direct web address of an image quickly and easily, ready to use in your writing, sharing, or content planning.
How to get an image URL from a picture on your computer
Sometimes you have a great photo sitting on your computer, and you want a link (URL) you can share or embed online. But unfortunately, local files don’t automatically have web addresses.
To turn your computer image into a proper image URL, you’ll need to upload it to an online host first, which then gives you that link you can use anywhere.
Here’s how to get the URL of an image on your computer:
1. Choose a trusted image-hosting site. There are free tools like ImgBB, Imghippo, or ImageToURL that let you upload pictures from your computer and instantly generate shareable URLs.
2. Open the site in your browser. Go to the host’s upload page. Most modern browsers work fine (Chrome, Safari, Firefox, Edge).
3. Upload your image file. Click the “Upload” or “Choose File” button, then pick the picture from your computer that you want to turn into a link.
4. Wait for the upload to finish. Most services upload quickly, usually within a few seconds, depending on your file size and internet speed.
5. Copy the generated URL. Once your image is uploaded, the site will show you one or more links, typically a direct image URL you can copy. This is the address that points to your uploaded picture on the web.
6. Use the link wherever you need it. Paste the URL into emails, blogs, websites, or social posts. Anyone with the link can now access the image.
That’s all!
By uploading your picture to a reliable host, you quickly get a proper URL that works just like the image links you find online every day.
Note: You can open your image file in a browser. Either drag the file into an open browser window, or use the keyboard shortcut Ctrl+O on Windows or Command-O on a Mac to browse and select it. Once the image loads, look at the address bar. You’ll see a file:///… URL (for example, file:///C:/Users/YourName/image.jpg), which points to the location of that image on your own computer. This is the local file URL (not for web sharing)!
How to get an image URL from a website on your computer
When you’re browsing the web on a computer and find an image you want to use or share, it’s usually just a couple of clicks to grab its direct image URL.
Most modern browsers make this super easy, and you can then paste that link wherever you need (in a document, blog post, or email).
Get an image URL from a website, step-by-step:
1. Open the webpage in your favorite browser (Chrome, Firefox, Edge, Safari).
- Navigate to the page where the picture you want is displayed.
2. Right-click the image you want.
- On a Windows PC or Mac with a mouse/trackpad, right-click directly on the picture. (If you’re using a laptop touchpad, a two-finger click usually works the same.)
3. Choose “Copy Image Address” (or similar).
- Most browsers will show an option like “Copy image address,” “Copy image URL,” or “Copy image link” in the menu that pops up. Click it!
4. Paste the URL where you need it.
- Go to a text field, right-click (or press Ctrl + V / Cmd + V), and paste the link you just copied.
👍 Tip: If the right-click menu doesn’t offer a direct copy (some sites block it), you can often open the image in a new tab and then copy the URL from your browser’s address bar.
And that’s it! You’ve got the image’s web address ready to share anywhere you want!
How to get an image URL from Google Drive (Cloud Service)
If you’ve stored a photo in Google Drive and need to use it online or share it on your blog, you can turn that file into a link. However, keep in mind that Google Drive doesn’t give you a ready-made direct image URL right away.
You’ll first share the file publicly and then tweak the link so it points straight to the image itself.
Here’s how to do it:
1. Sign in and find your image: Open Google Drive in your web browser and locate the image file you want a URL for. Make sure it’s an image (like JPG, PNG, etc.).
2. Share the image: Right-click the image and choose “Share”. In the sharing settings, set access to “Anyone with the link (Viewer)” so others can view it. Then click “Copy link”.
3. Grab the file ID: The shared link looks something like:
- https://drive.google.com/file/d/FILE_ID/view?usp=sharing
- Copy the part in the middle (between /d/ and /view). That’s your file ID.
4. Build a usable image URL: Google Drive’s default share link doesn’t show the full image directly, so make a direct image link like this:
- https://drive.google.com/uc?export=view&id=FILE_ID
- Replace FILE_ID with the text you copied. This new URL will display the image itself.
5. Test your link: Paste the final URL into a new browser tab. If it shows just the image and nothing else, you’re all set!
Now you can use that image URL in blogs, websites, or wherever you need it. Just remember that the image must be shared publicly for others to see it.
How to get an image URL from File Explorer
Unlike web browsers, File Explorer on your computer doesn’t give you a shareable online URL for an image, because local files don’t live on the web by default.
What you can do in File Explorer is copy the full file path (the local address of the image on your PC), and if you need a clickable link, convert it into a file-URL format.
This local path is useful for linking to files on your own machine or a shared network or for debugging.
Here’s how to get an image URL (or path) in File Explorer:
1. Open File Explorer: Press Windows + E or click the folder icon on the taskbar to launch File Explorer and navigate to the folder with your image.
2. Select the image file: Click once on the image file you want to get the path for, so it gets highlighted.
3. Copy the full file path
- Right-click the file and choose “Copy as path” from the context menu. This copies the image’s full path to your clipboard.
- In Windows 11, you can also select the file, click the three dots (…) in the toolbar, then choose Copy Path.
- Or press Ctrl + Shift + C as a shortcut in newer versions of Windows.
4. Paste the path where you need it: Go to a text box, document, or message and press Ctrl + V to paste the file path you copied.
5. Turn it into a file-url (optional): If you want a clickable file link (for example, in an email), add file:// in front of the path you copied. For instance:
file:///C:/Users/YourName/Pictures/photo.jpg
This tells Windows and some apps that it’s a file URL rather than plain text.
💡 Note: This local path isn’t a web URL that everyone can open online. It only works on your computer or on a shared network where others have access to the same location.
How to get an image URL from files
Getting a shareable image URL from a file on your computer isn’t something your file system does by itself. Local files don’t automatically have web addresses.
To turn a photo into a usable online link, you need to upload it to an image-hosting service, which then gives you a link (URL) you can paste anywhere.
These tools take your image and generate a link that works just like any other image URL online.
Here is a step-by-step guide to get the job done:
1. Pick an online image host or converter tool: Use a free service that lets you upload images and generate a link instantly. Popular options include PictureToLink and ImageToURL. Both let you upload files and get a direct URL you can use online.
2. Open the tool in your browser: Go to the image-to-URL site using a browser on your computer like Chrome, Safari, or Firefox.
3. Upload your image file: Click the upload button or drag & drop your image into the upload area. Most tools support common formats like JPG, PNG, GIF, and WebP.
4. Wait for the upload to complete: The site will usually take just a couple of seconds to upload and process your picture.
5. Copy the generated URL: Once the image is uploaded, the tool will display a direct link (URL) to your image file. Copy it!
6. Use the link wherever you need it: Paste the image URL into your blog post, social media, website editor, or any other place where you want the picture to show up.
That’s it!
By using an image hosting or link generation service, you turn files on your computer into real, shareable URLs in just a few steps.
How to get an image URL from downloads
When you’ve downloaded an image to your computer or phone, it doesn’t automatically have a web-ready image URL, because downloads live locally on your device, not on the internet.
To turn a downloaded photo into a shareable image URL, you’ll need to upload it to an online platform that can host your file and give you a link you can use anywhere online.
Step-by-step guide to get an image URL from downloads:
1. Locate the downloaded image file
- On a computer, open your Downloads folder (usually found in “File Explorer” on Windows or “Finder” on Mac).
- On a phone or tablet, open your Files or Downloads app and find the picture you just saved.
2. Pick an image hosting service. Select a free tool online that lets you upload files and quickly turns them into online URLs you can copy.
3. Upload the image. Go to the hosting site in your browser, click the upload button (or drag & drop), and select your downloaded image.
4. Wait for the upload to finish. Most sites only take a few seconds to process your image and generate a link.
5. Copy the generated URL. Once your image is uploaded, the service will provide a direct URL to the image. Just copy it!
6. Use that link wherever you need it. Paste the URL into your blog, social media post, website, or message so others can view the image online.
That’s all!
By uploading your downloaded photo to an online host, you turn a local file into a usable image URL that works anywhere online.
How to get an image URL from a screenshot
Since screenshots live on your device and don’t automatically have a web address, you can’t just copy a URL like you would with an online image.
To get a shareable image URL from a screenshot, you’ll need to upload it to a hosting service that stores your picture online and gives you a link you can use anywhere.
The approach is super simple and only takes a few minutes!
Here’s how to do it:
1. Take the screenshot: Capture the part of your screen you need. On Windows, use PrtScn or Windows + Shift + S. On Mac, use Cmd + Shift + 4, and on mobile, use the button combo or gesture for your particular device.
2. Open a free image uploader: Go to a site like SnipFly, ScrinX, FastSnap, Snipboard.io, or ImgShare.cc in your browser. These services let you upload screenshots or images without creating an account, and they give you a link you can share instantly.
3. Upload or paste your screenshot: Most tools let you drag and drop your file, paste it from your clipboard, or browse to select it from your device. Just follow what the page tells you.
4. Wait a second for processing: These sites handle uploads quickly, usually within a couple of seconds.
5. Copy the generated URL: Once uploaded, the service will show a link that points directly to your screenshot online. Click Copy or highlight and copy the URL.
6. Use the link anywhere: Paste that URL in emails, blog editors, chat apps, or anywhere else you want to share the screenshot.
Just like that, your local screenshot becomes a usable image URL on the internet!
Also read: How to scan QR code from screenshot or photo: A practical guide for iPhone & Android users
How to get an image URL for HTML
If you want to show an image inside a webpage using HTML, you need to use the image’s URL inside an <img> tag, which tells the browser where to find and load the picture.
The src attribute holds that image URL, and when the page loads, the browser uses it to fetch and display your image.
Here’s a friendly, step-by-step walk-through to make it simple:
1. Make sure the image is hosted online: Your image must be available somewhere on the web, either on your own server, a cloud drive with public access, or an image host. The URL must point directly to the image file (ending in .jpg, .png, .gif, etc.).
2. Start with a basic HTML file: Open your HTML file in a text editor (like Notepad, VS Code, Sublime, etc.) and make sure it has the basic structure:
<!DOCTYPE html>
<html>
<head>
<title>My Page</title>
</head>
<body>
<!– Image goes here –>
</body>
</html>
3. Add the <img> tag with the image URL: Inside the <body> section, write the <img> tag like this:
<img src=”https://example.com/myphoto.jpg” alt=”A description of the image”>
- src=”…” is where your image URL goes. This is what the browser uses to load the picture.
- alt=”…” helps people who can’t see the image and also boosts accessibility.
4. Save and open your HTML file: Once you save your changes and open the file in your browser, your image will show up. The browser fetches the file from the URL you provided and displays it on the page.
5. Use relative URLs when possible: If the image file is stored in your website’s folder (like /images/photo.jpg), you can use a relative URL instead of a full web address. The browser will look in the right place based on your site’s folder structure.
And that’s all there is to it!
By putting the correct image URL in the src attribute of an <img> tag, your picture becomes part of your webpage and will load for anyone who visits.
How to get an image URL online using image hosting sites
If you want a shareable image URL without hosting the file yourself, services like ImgBB and Imgur make this super simple.
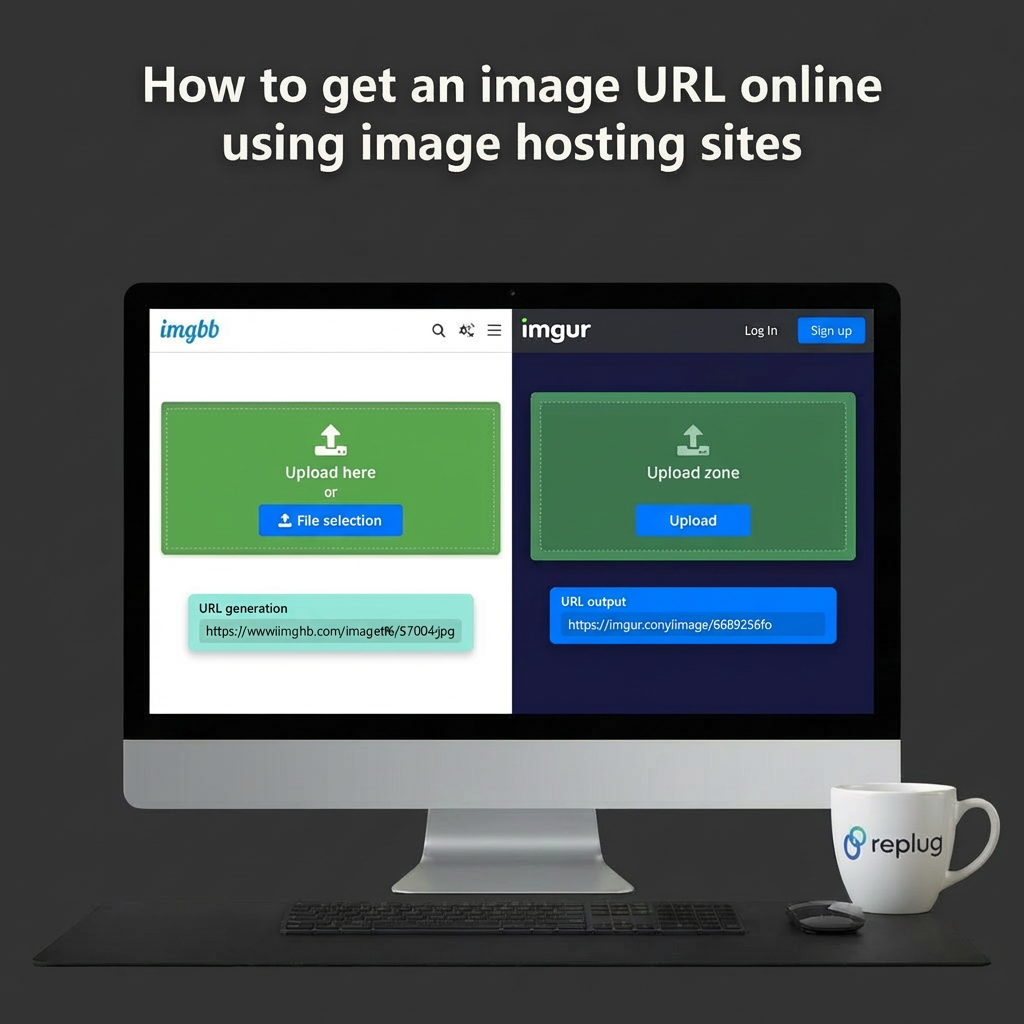
These platforms let you upload pictures from your computer or phone and then provide a public link you can use anywhere, such as blogs, websites, forums, messages, and more.
Each service works a little differently, so here’s a clear walkthrough for both!
Using ImgBB
“ImgBB” is a free image hosting site that’s really beginner-friendly and doesn’t require an account to upload images.
Steps to get an image URL with ImgBB:
1. Open your browser and go to ImgBB: Visit the site, and you’ll see the upload area right away.
2. Upload your image: Drag and drop your photo into the upload box, or click the upload button and pick the file from your device.
3. Wait for the upload to finish: It usually only takes a few seconds.
4. Copy the link(s) shown: After uploading, ImgBB gives you several link options, including a direct image URL that ends in the file extension, like .jpg or .png. Just click Copy next to that link to save it.
5. Use your image URL: Paste it wherever you want the picture to appear online.
Using Imgur
“Imgur” is one of the most popular image-hosting sites on the web, having been around since 2009. It’s known for fast uploads and easy sharing!
Steps to get an image URL with Imgur:
1. Go to imgur.com or the Imgur upload page: You can use the main site or a direct uploader tool.
2. Add your image: Click “New post” (or drag and drop on some upload pages) and select the photo from your computer or phone.
3. Wait for the upload: After selecting, Imgur will process and upload the image.
4. Get the share link: Once uploaded, Imgur shows your image. Pick the “three dots (•••) or the share icon,” or use the site’s share options (“Get share links”) to copy the URL ending in .jpg, .png, etc. That’s your direct image link.
5. Paste and use: Now you can paste that link wherever you need it online.
How to get an image URL for your own uploaded images
Getting a URL for an image you upload just means uploading the picture to a place on the internet and then copying the web link that points directly to that image. Uploading your own image and grabbing its URL is easier than it sounds.
Here’s a simple guide you can follow step by step:
1. Choose where you’ll upload your image: First, pick a service that lets you upload images and gives you a link.
- Free image link tools like ImageToURL let you upload and generate a link instantly, with no login required.
- Other sites (e.g., ImgBB) also let you upload images and then copy different kinds of links, like direct links or HTML embed codes.
You can choose whichever one feels easiest.
2. Upload the image file: Once you’re on the tool’s page:
- Click the upload button or drag your image file into the box.
- Or, pick the image you want from your device.
As soon as the upload finishes, the tool will process your image and prepare a link.
3. Find and copy your image URL: After uploading:
- Look for a field labeled “Direct Link,” “Copy Link,” “Image URL,” or “Shareable Link.”
- Click the Copy button next to that link, or select the link and copy it manually.
This link is the public web address you can share with others.
4. Use the image URL wherever you want: Now that you’ve copied the link:
- Paste it in chat apps, emails, forums, blogs, or your website.
- If you’re writing HTML, you can even embed it like this:
<img src=”YOUR_IMAGE_URL_HERE” alt=”My Image”>
That’s all! Your uploaded image now has its own web address!
5. Manage or delete your image later (optional): Some image hosts let you manage your uploaded files later:
- You might need to create an account to keep a gallery or delete old images.
- With free tools that don’t require an account, the image might remain public as long as the service keeps it online.
How to get an image URL from Pinterest
Getting an image URL from Pinterest means finding a link that points directly to an image file used in a “Pin” so you can share it, download it, or use it elsewhere.
Unlike a normal web image, Pinterest doesn’t always make the file link obvious, but there are a few ways to grab one.
Here’s how to get the job done, step by step:
1. Open the pin you want: First, go to Pinterest and open the pin whose image you’re interested in. You can do this on your phone (in the app or in the browser) or on a desktop.
2. Copy the pin’s page URL: While this isn’t technically the image file URL, it’s the first part you’ll need.
- On desktop: click into the pin and copy the link from your browser’s address bar.
- On mobile: tap the Share button (usually “⋯” or a share icon) and choose Copy Link.
This gives you the Pinterest pin page link that points to the content you want.
Note: This link is to the Pin page itself, not the direct image file, but it’s the most reliable way to locate the image with online tools.
3. Use a Pinterest image downloader tool: Because Pinterest doesn’t show the actual image file URL in the app by default, most people use a simple online tool that extracts the image for you.
4. Right-click to copy direct image URL (desktop): If you’re on a desktop browser and the tool shows the loaded image in your browser window:
- Right-click the image and choose “Copy Image Address,” “Copy Image Link,” or “Open Image in New Tab.”
- The URL that appears in the browser when it’s opened alone is the actual image file URL (often hosted on Pinterest’s i.pinimg.com).
This method sometimes works best when you want the original, full-resolution image link.
Friendly tips:
✔️ Pinterest doesn’t always let you directly copy an image URL from the app as a simple “Copy image address”. That’s just how their system works. A pin page link and a downloader tool are usually the easiest route.
✔️ Only public pins are accessible this way. Private boards and protected content won’t show up properly.
✔️ Use the direct image URL responsibly and respect copyright. These images belong to other users unless they’re your own content.
How to get an image URL from Canva
Getting an image URL from Canva means finding a direct link to an image you’ve created or exported in Canva so you can share it, embed it in a webpage, or use it elsewhere (not just a link to the Canva project page itself).
Here’s a simple, friendly step-by-step guide to help you do that without any confusing jargon:
1. Open your design in Canva: First, log in to your Canva account and open the design that has the image you want a URL for. This could be a logo, graphic, photo, or anything you created in Canva.
2. Export or download the image: Canva doesn’t always show the raw image URL inside the editor, so the easiest way to get a usable link is to export the image first:
- Click Share (top right) → Download.
- Pick an image format like PNG or JPG.
- Click Download to save it to your device.
This gives you an image file (like .png or .jpg), but not a URL yet. Don’t worry, we’ll get that next.
3. Upload your exported image somewhere public: Once the image is saved to your device, you need to upload it somewhere that gives you a direct image URL. Common places include:
- Imgur
- Google Drive / Dropbox (shared publicly)
- Online image hosts like FreeImageHosting, Imgbb, etc.
Make sure the upload is set to public view so anyone with the link can see it.
4. Copy the direct image link: After uploading:
- Find your uploaded image in the host you chose.
- Right-click (or tap the share icon on mobile) and select Copy image address or Copy link.
This link now points to a direct image URL. You can paste it anywhere, and it will show the image.
Quick tips to keep in mind:
✔️ Canva’s share link isn’t the same as an image URL. The regular share link points to the design, not the raw image file.
✔️ Direct image URLs are usually created by uploading the exported file to an image host or cloud storage and then copying the public link.
✔️ Respect copyright and ownership. Only use multimedia you have rights to share.
Read also: How to get Snapchat URL: A detailed guide for Snapchat users in 2026
How to get image URLs in bulk
Getting image URLs in bulk means grabbing a bunch of direct image links at once, rather than doing it one by one.
You can use online tools or browser add-ons that scan a webpage (or a list of pages) and collect all the images they find. Then show or export all those image URLs together so you can download, save, or work with them as needed.
It’s super handy when you’re pulling photos or AI images for research, design boards, social media planning, or archiving.
Various ways you can use these image URLs/links
Image URLs are direct web links that point straight to pictures online, and they can be used in lots of helpful ways across the internet. They make sharing and embedding images super easy and flexible.
Here are some common and useful ways you can use image URLs:
- Embed images on websites: Paste the image link into HTML or a content editor to display the picture on your site.
- Share on social media or chats: Drop the URL in a message or post to show the image without uploading it again.
- Insert into blogs or articles: Use the URL to quickly add visuals to blog posts or online guides.
- Add images in web apps or editors: Paste the link directly into tools like WordPress or rich-text editors that accept image URLs.
- Use in code or email signatures: Include the URL in HTML <img> tags for emails, newsletters, or site code.
- Reference hosted images: Keep the images hosted in one place and reuse the same links across multiple projects without storing multiple copies.
These simple image links make life easier when you want to display, share, or reuse visuals online without having to upload them from scratch.
Shorten long image URLs using Replug!
If you’re looking for a free, short image URL generator that makes messy, long URLs or links clean and easy to share, Replug is a solid choice that does just that while giving you tracking and customization options, too.

Here’s how to use Replug to shorten long image URLs step by step:
1. Sign in or make a free Replug account: Go to Replug and either log in or sign up.
2. Find the URL field: On your Replug dashboard, look for the box labeled “Quickly Shorten your link.”
3. Paste your long image URL: Paste the long link you want to shorten (this can be the direct link to your image) into that box.
4. Generate the short link: Click the blue arrow button to shorten it. Replug will instantly create a neat, trimmed-down version of your original URL.
5. Customize (optional): If you’d like, you can edit the ending part of the short link (i.e., the URL slug) to make it easier to remember or more on-brand.
6. Copy and use it anywhere: Once it’s ready, copy your new short link and paste it in your social posts, emails, or wherever you need to share your image.
That’s it! A quick way to turn long image URLs into simple, shareable links that look clean and professional.
Summing up
In this blog, we’ve walked through what an image URL is and all the practical ways you can find one, whether you’re on mobile, your computer, from screenshots, cloud storage, or even sites like Pinterest and Canva.
We also covered how to grab these links in bulk and the many ways you can use image URLs in your projects.
And if you’re dealing with long, messy links, remember you can shorten such URLs using Replug to keep everything tidy and trackable.
If you’re looking for an easy way to manage and optimize your links with features that actually help you grow, why not give Replug’s short URL tool a try? It’s a solid all-in-one platform worth checking out!

Frequently asked questions

Muhammad Ahsan Jamal
