A CTA campaign in Replug puts your own message, with a button, link or sign-up form, on top of the pages you share through your short links. You set it up once in a campaign, and every link you shorten into that campaign shows it. This guide walks through each step in the current Replug app, shows what you can track afterwards and covers the limits worth knowing before you start.
Quick answer: in Replug, open Campaigns and click Create new. Name the campaign, select Call-to-action (CTA), pick a type (Button, Link or Form) and a style, write the headline, message and button, choose when the CTA appears, and click Save campaign. Then pick that campaign in the Campaign field whenever you shorten a link. CTAs are on the Essentials plan and above, per replug.io/pricing.
What is a CTA campaign in Replug?
In Replug, a campaign is a group of links that behave the same way. A call-to-action (CTA) campaign adds a message on top of the destination page: someone clicks your short link, the page you linked to opens, and your CTA appears over it with your headline, a short message and a button, link or form. You can use it to point readers of an article you shared to your own offer, newsletter or booking page, even when that article lives on someone else’s site. Learn more about Replug and its call to action generator.
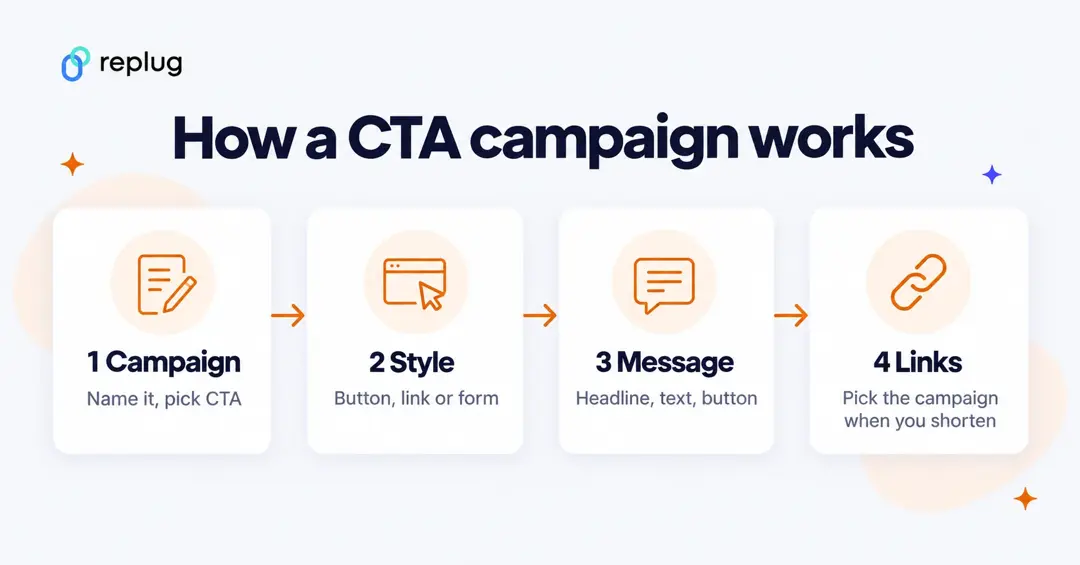
When you choose the call-to-action widget, the next step asks for one of three types:
- Button: a clickable CTA button that sends visitors to the URL you choose, or starts a phone call if you enter a tel: number (click to call).
- Link: the same idea as a text link instead of a button, for a lighter look.
- Form: an email sign-up form. Submissions go to a list in the email service provider you connect, so you can collect leads from the pages you share. You can add a name field and consent checkboxes.
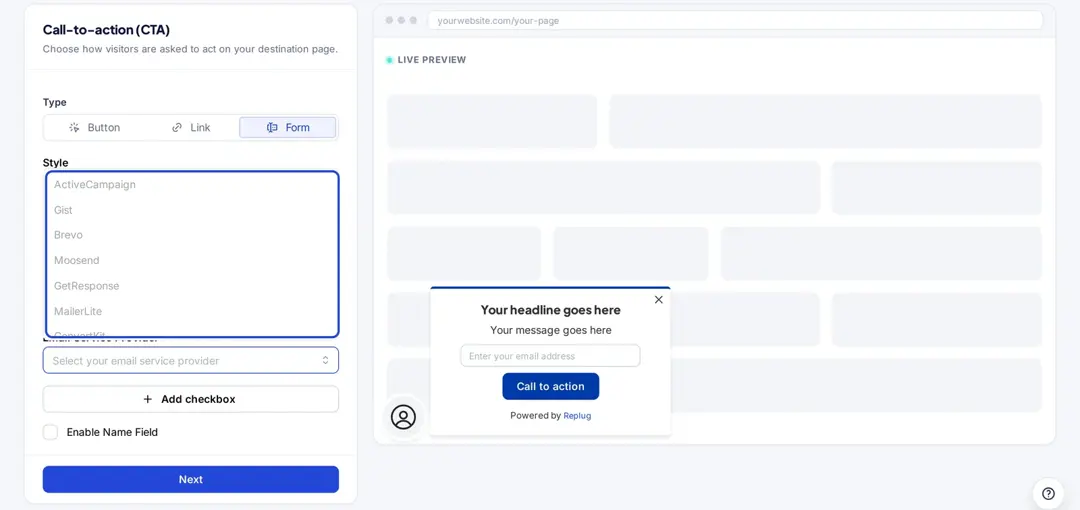
For the Form type, the email service providers in the app’s list are ActiveCampaign, Gist, Brevo, Moosend, GetResponse, MailerLite, ConvertKit, Sendy, Mailchimp, Campaign Monitor, AWeber and Constant Contact (checked in the app in October 2026). Connect your account first under Settings > Integrations; the provider then shows up in the campaign’s Email Service Provider menu.
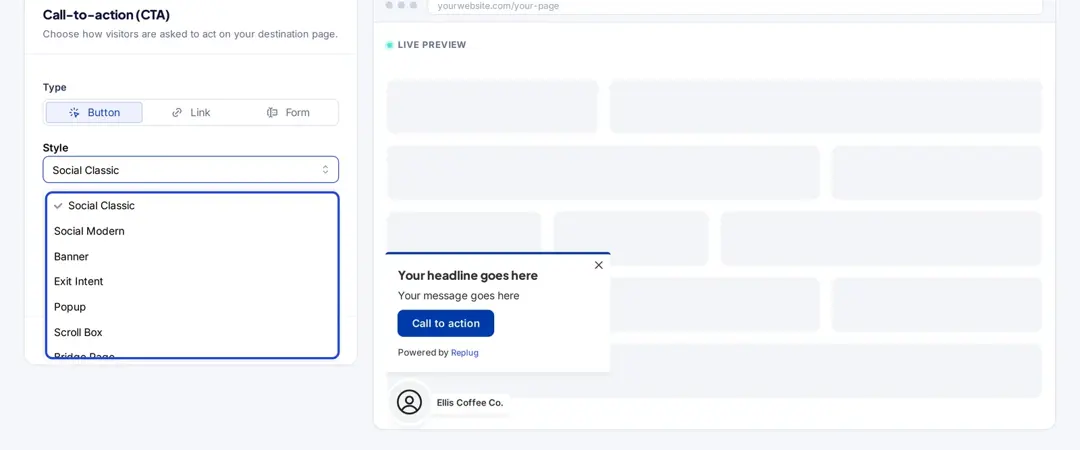
Each type comes in seven styles: Social Classic, Social Modern, Banner, Exit Intent, Popup, Scroll Box and Bridge Page. The Exit Intent and Bridge Page styles let you add a large background image (the app recommends 920 x 1080 px), and a Bridge Page sends visitors on to the destination after the number of seconds you set. The live preview on the right of each step shows how the style looks before you save.
How to create a CTA campaign in Replug?
These steps match the current Replug app. Screenshots use a demo workspace for a fictional coffee shop, Ellis Coffee Co. in Austin, TX.
Step 1: Sign in to Replug
Sign in to Replug or create a free account. The Free plan doesn’t include CTAs; they start on Essentials, and paid plans come with a 14-day free trial, per replug.io/pricing.
Step 2: Open Campaigns and click Create new
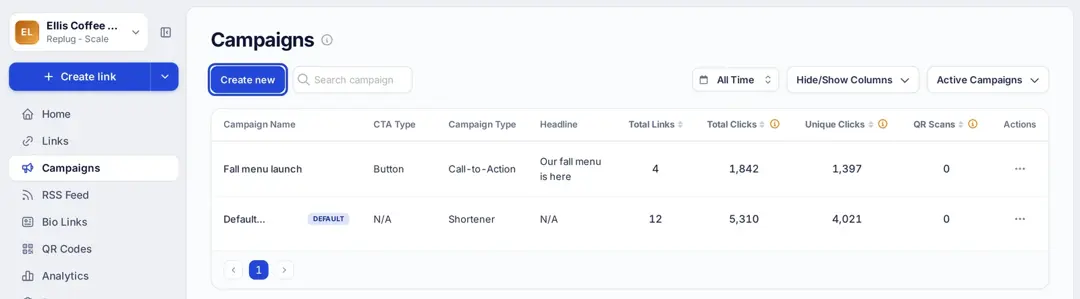
In the left menu, click Campaigns, then Create new. The list shows your existing campaigns with their CTA type, campaign type, total links, clicks, unique clicks and QR scans.
Step 3: Name the campaign and choose Call-to-action (CTA)
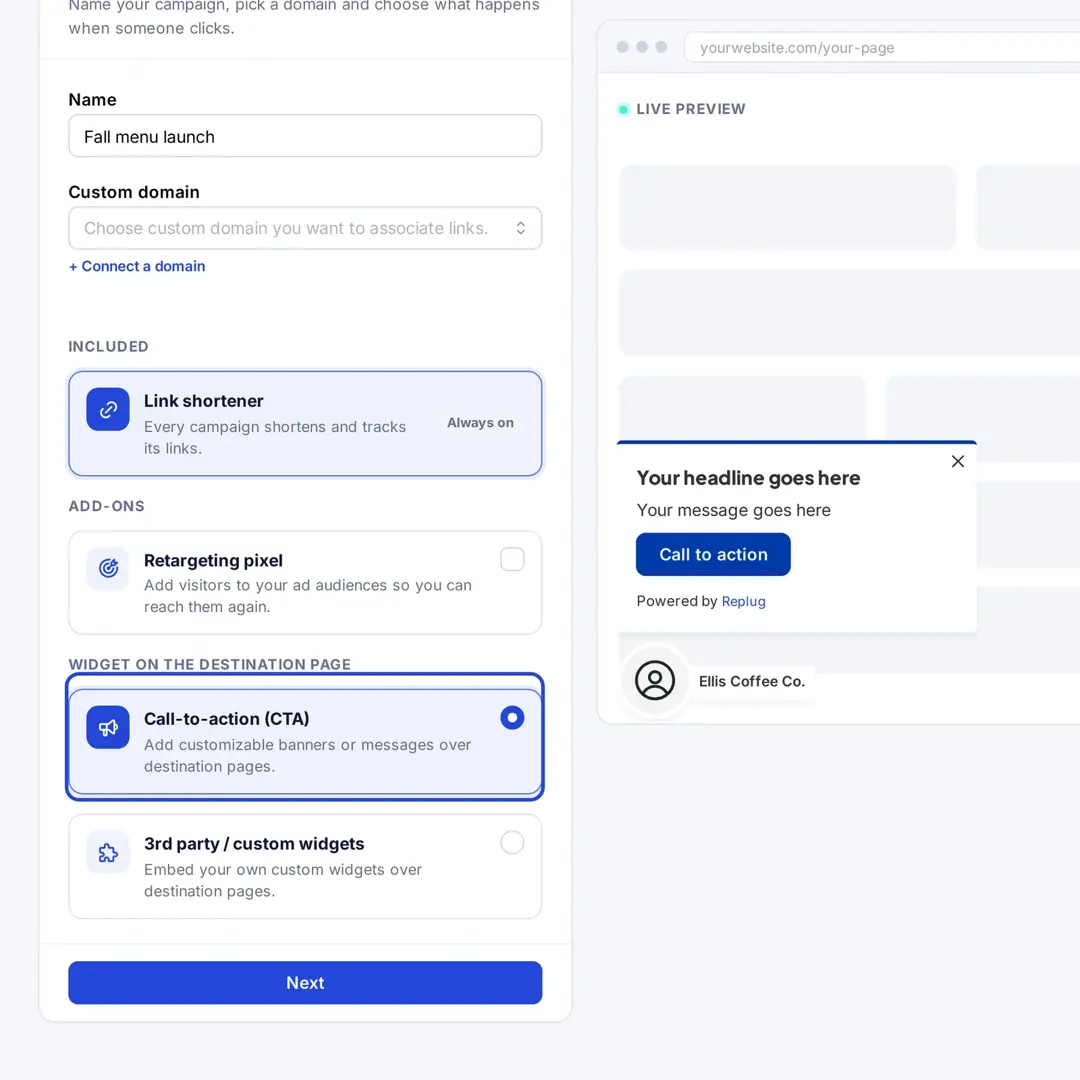
On the Campaign type step, give the campaign a name you’ll recognize later, such as “Fall menu launch”. Optionally pick a custom domain for its links. The link shortener is always on. Under Widget on the destination page, select Call-to-action (CTA). If you also want to build an ad audience from the people who click, turn on the Retargeting pixel add-on here. Click Next.
Step 4: Pick the CTA type and style
Choose the Type (Button, Link or Form) and a Style from the menu. You can upload a small CTA image, such as your logo; the app recommends 64 x 64 px.
If you chose Form, select your Email Service Provider, the connected account and the email list that should receive sign-ups. Tick Enable Name Field if you want names as well as emails, and use Add checkbox for consent text such as “Send me the weekly roast list”. Click Next.
Step 5: Write the message
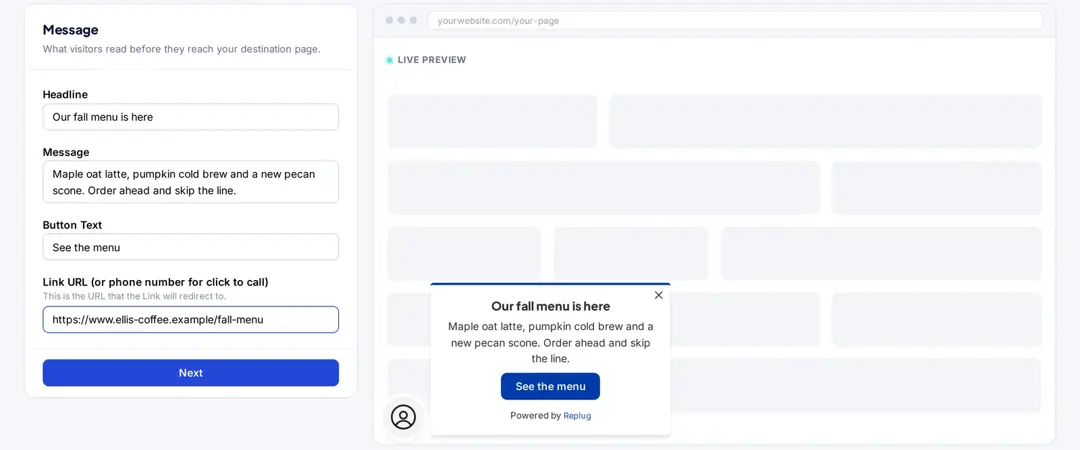
Fill in the Headline, the Message, the Button Text (or Link Text) and the URL the button or link opens. To start a phone call instead, enter a number in the tel: format. For a form you can also turn on redirection after a visitor submits it. Keep the headline to one idea and the button to two or three words; our guide on how to write a call to action has more on wording. Click Next.
Step 6: Customize it and save
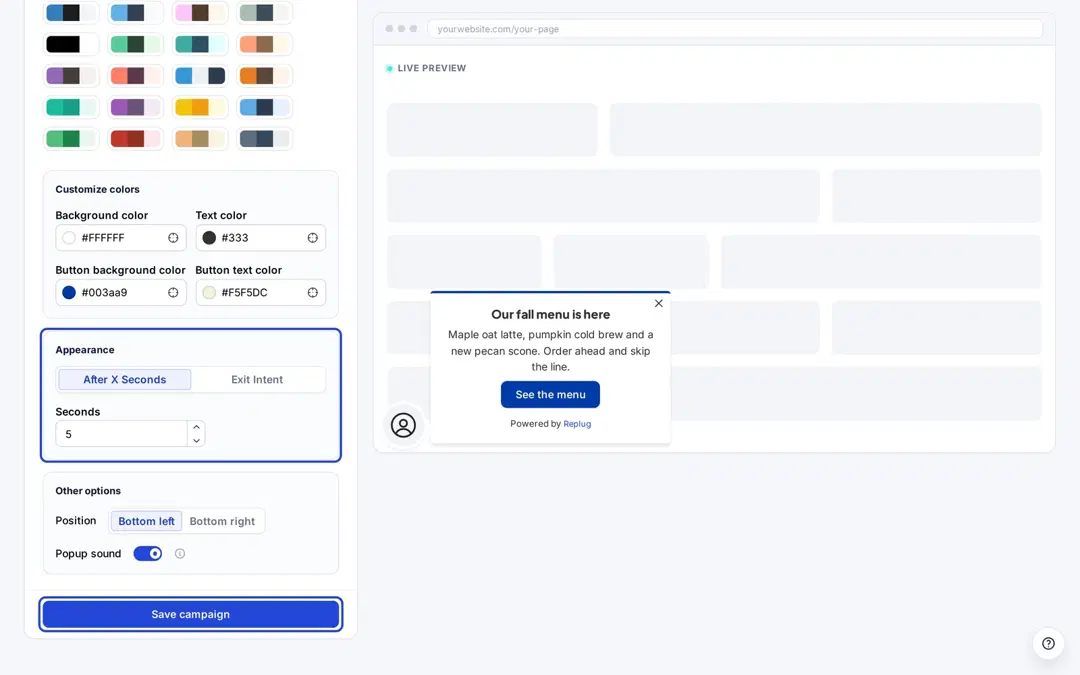
Pick a color preset or set the background, text, button background and button text colors yourself. Under Appearance, choose After X Seconds (and the number of seconds) or Exit Intent to show the CTA when someone is about to leave the page. Under Other options, set the position (bottom left or bottom right) and the pop-up sound. Click Save campaign. If you turned on the retargeting add-on, a Retargeting Pixels step comes first.
Step 7: Add the campaign to your links
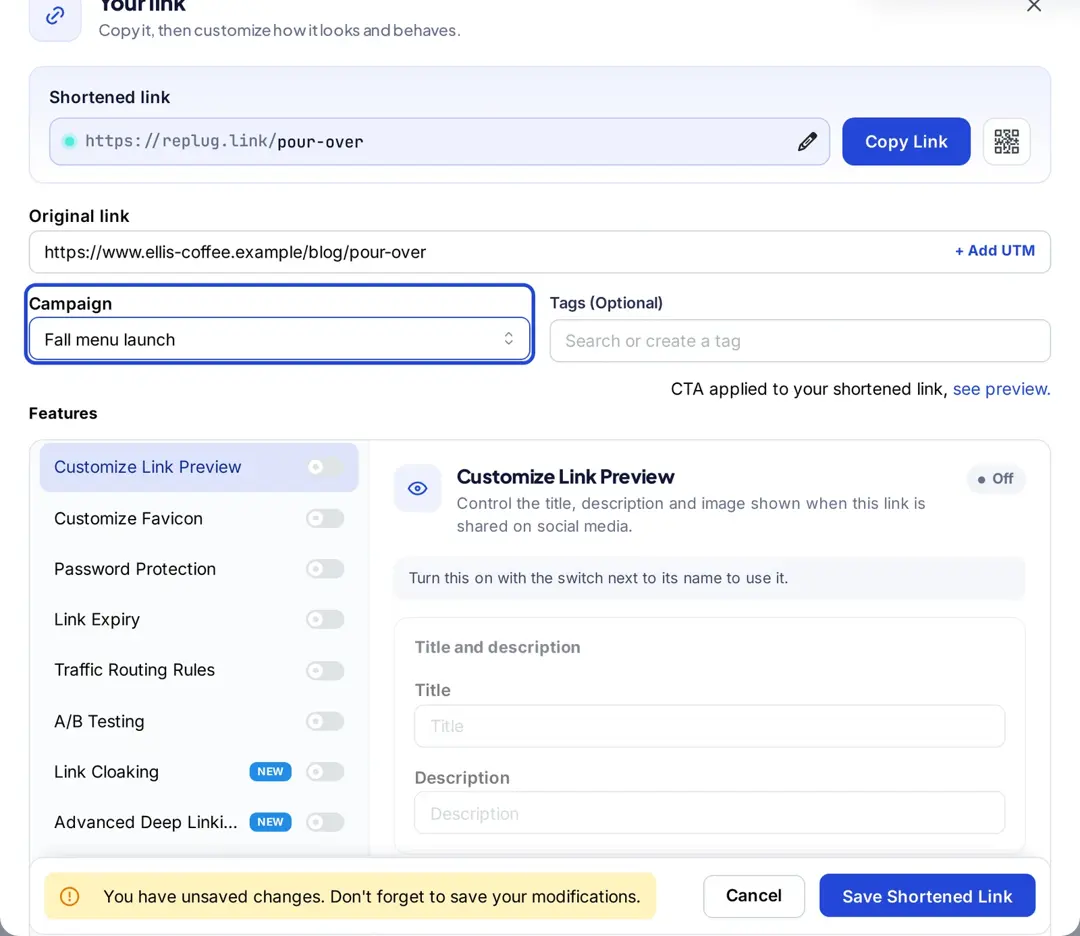
Shorten a link from the Home page or with Create link. In the Your link window, choose your CTA campaign in the Campaign field and save. The window confirms “CTA applied to your shortened link” with a preview link. Share the short link in a post, email or bio.
Track your CTA campaigns with Replug
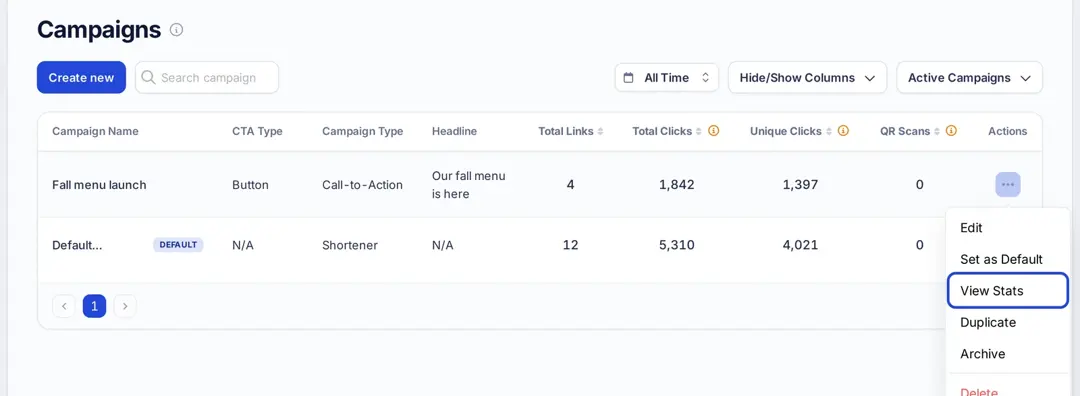
The Campaigns list shows each campaign’s total links, total clicks, unique clicks and QR scans. To see more, open the actions menu (the three dots) on a campaign row and click View Stats.
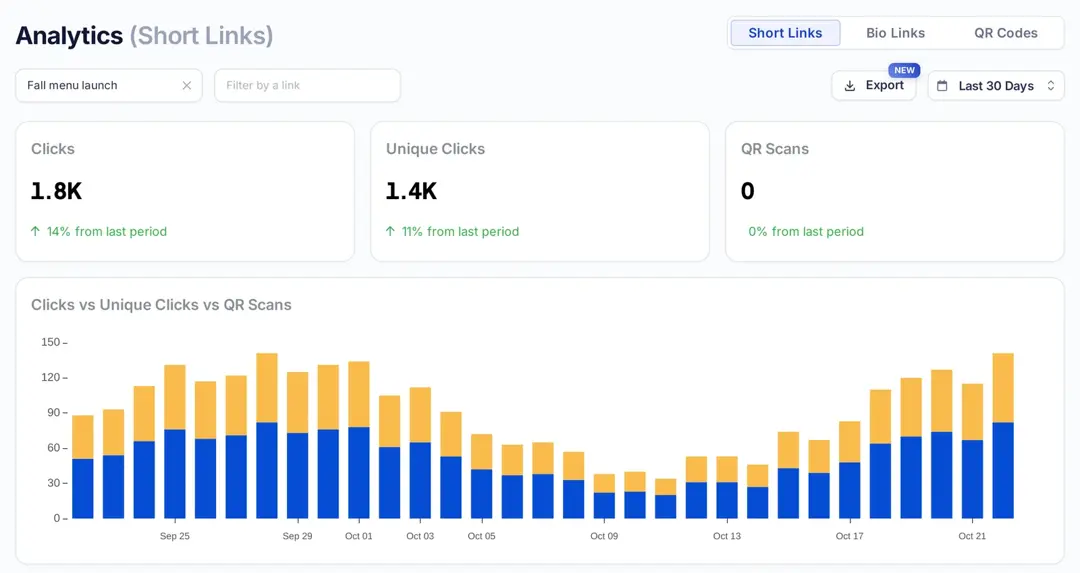
This opens Analytics filtered to that campaign. Here’s what to watch:
- Overview: clicks, unique clicks and QR scans for the period you pick, with the change from the previous period.
- Clicks over time: a daily chart of clicks and unique clicks, so you can see when a post or email drove traffic. To improve those numbers, learn how to write a call to action people click.
- Visitors by browser and operating system: check your CTA style on the browsers and phones your audience uses most.
- Visitors by country and city: see where clicks come from, which helps when you run region-specific offers.
- Visitors by source/referrer: see which sites and apps send the clicks, so you know which channels to post on more.
Two things to know when you read these numbers. Replug counts clicks on your short links; it doesn’t track sales, sign-ups or other conversions on the destination page, so measure those in your website analytics, and form sign-ups in your email tool. And how far back you can look depends on your plan: 14 days on Free, 90 days on Essentials and unlimited history on Scale and Agency, per replug.io/pricing.
Tips for CTA campaigns people click
- One campaign per offer or audience. The CTA travels with every link in the campaign, so a “Fall menu launch” campaign shouldn’t also carry links meant for wholesale buyers.
- Match the CTA to the content you share. A coffee brewing article pairs well with “Shop whole-bean coffee”; a hiring post doesn’t.
- Pick the timing on purpose. A few seconds’ delay lets people start reading first; Exit Intent catches them as they leave.
- Test one change at a time. Make two campaigns that differ only in the headline or button, share each with similar posts and compare unique clicks per link.
- For more ideas, see these social media CTA examples, our comparison of call to action tools and the guide to CTA overlays.
Limits to know before you start
- Some sites can’t show a CTA. The CTA appears over the destination page, which Replug shows inside a frame. Sites that block framing can’t be used this way, and Replug doesn’t allow NSFW sites, per the Replug help center.
- Plan level. CTAs, CTA types, a custom CTA image, exit-intent pop-ups and bridge pages are on Essentials and above; the Free plan gets link shortening and analytics without CTAs, per replug.io/pricing.
- Clicks, not conversions. Replug reports clicks and unique clicks on your links; use your analytics or email tool for what happens after the click.
To further boost your campaign performance, consider using a short link generated by Replug to simplify sharing, improve tracking accuracy, and make every CTA more effective.
FAQs
Frequently Asked Questions

Arslan Jadoon